What a Fair Value Gap Really Is
A Fair Value Gap on XAUUSD is a three candle price zone where the wicks of candle 1 and candle 3 do not overlap, left by an aggressive displacement candle. It is tradable only when four checks pass: strong displacement, no wick overlap, a liquidity sweep before the gap, and an entry near the 50 percent Consequent Encroachment level.
- Displacement: the middle candle closes with a large body that breaks structure.
- No wick overlap: candle 1 and candle 3 leave a clean, untraded range.
- Prior sweep: equal highs, equal lows or a session extreme were taken first.
- Consequent Encroachment: the 50 percent level of the gap balances entry against invalidation.
A Fair Value Gap (FVG) is a three candle imbalance where price moved so aggressively that the wicks of candle 1 and candle 3 never overlap. The body of candle 2 leaves an unfilled vertical zone on the chart. That zone is the FVG, and on XAU/USD it is one of the clearest footprints of institutional order flow.
Large participants cannot fill size at a single price. When they push gold several dollars in one 15 minute candle, they leave behind one sided delivery. Price frequently returns to rebalance that zone before continuing. That return is the trade, but only when the context around the gap qualifies it.
In a bullish FVG, the zone runs from the high of candle 1 to the low of candle 3. In a bearish FVG, it runs from the low of candle 1 to the high of candle 3. The midpoint of that zone is called the Consequent Encroachment (CE) level.
How to Spot a Valid FVG on Gold
On a 15 minute XAU/USD chart, walk through the last leg of impulsive movement and tick four boxes:
- Three consecutive candles, with the middle one being the displacement candle: a large body closing near its extreme.
- No wick overlap between candle 1 and candle 3. If they touch even by a tick, it is not a valid FVG.
- The displacement broke structure with a candle body close beyond a prior swing high or low. A wick through the level is a sweep, not a Break of Structure.
- Liquidity was swept immediately before the displacement: equal highs, equal lows, or a session high or low. See the liquidity sweep guide for how to read the raid.
If all four boxes are ticked, you have an institutional FVG. If only the first two are present, you have a retail gap that price may ignore entirely.
Which FVGs Deserve Attention
Not every valid gap carries the same weight. Rank them before you plan an entry:
- Timeframe: H4 and H1 gaps outrank M15 gaps. An M15 FVG nested inside an H1 FVG is the strongest alignment.
- Session: gaps printed during the London open or the New York open carry real participation. Gaps from thin Asian hours are lower quality.
- Freshness: an untouched FVG is preferred. Once price has traded through the CE level, the gap is mitigated and loses most of its value.
- Origin: a gap that also sits next to a qualified Order Block adds confluence. A gap floating in the middle of a range adds very little.
Trading the FVG on XAU/USD
The execution flow is mechanical. Bias is set on H4. The trigger comes on M15. The entry sits at the FVG.
- Mark H4 bias from the last Break of Structure. If H4 is bullish, you only trade bullish FVGs on M15.
- Wait for M15 price to sweep a clean pool of sell side liquidity (equal lows, previous day low, Asia low).
- Look for an M15 Change of Character followed by a displacement candle that leaves an FVG.
- Set a limit order at the 50 percent mark of the FVG. Stop loss goes beyond the swept low, not beyond the gap edge. Targets are the next pool of buy side liquidity.
The 50 percent level is a balanced entry: it improves the price compared with the top of the gap, while keeping the order inside the imbalance before deeper invalidation. If price closes a body through the far side of the FVG, the setup is void.
Worked Example: A Bullish FVG on M15
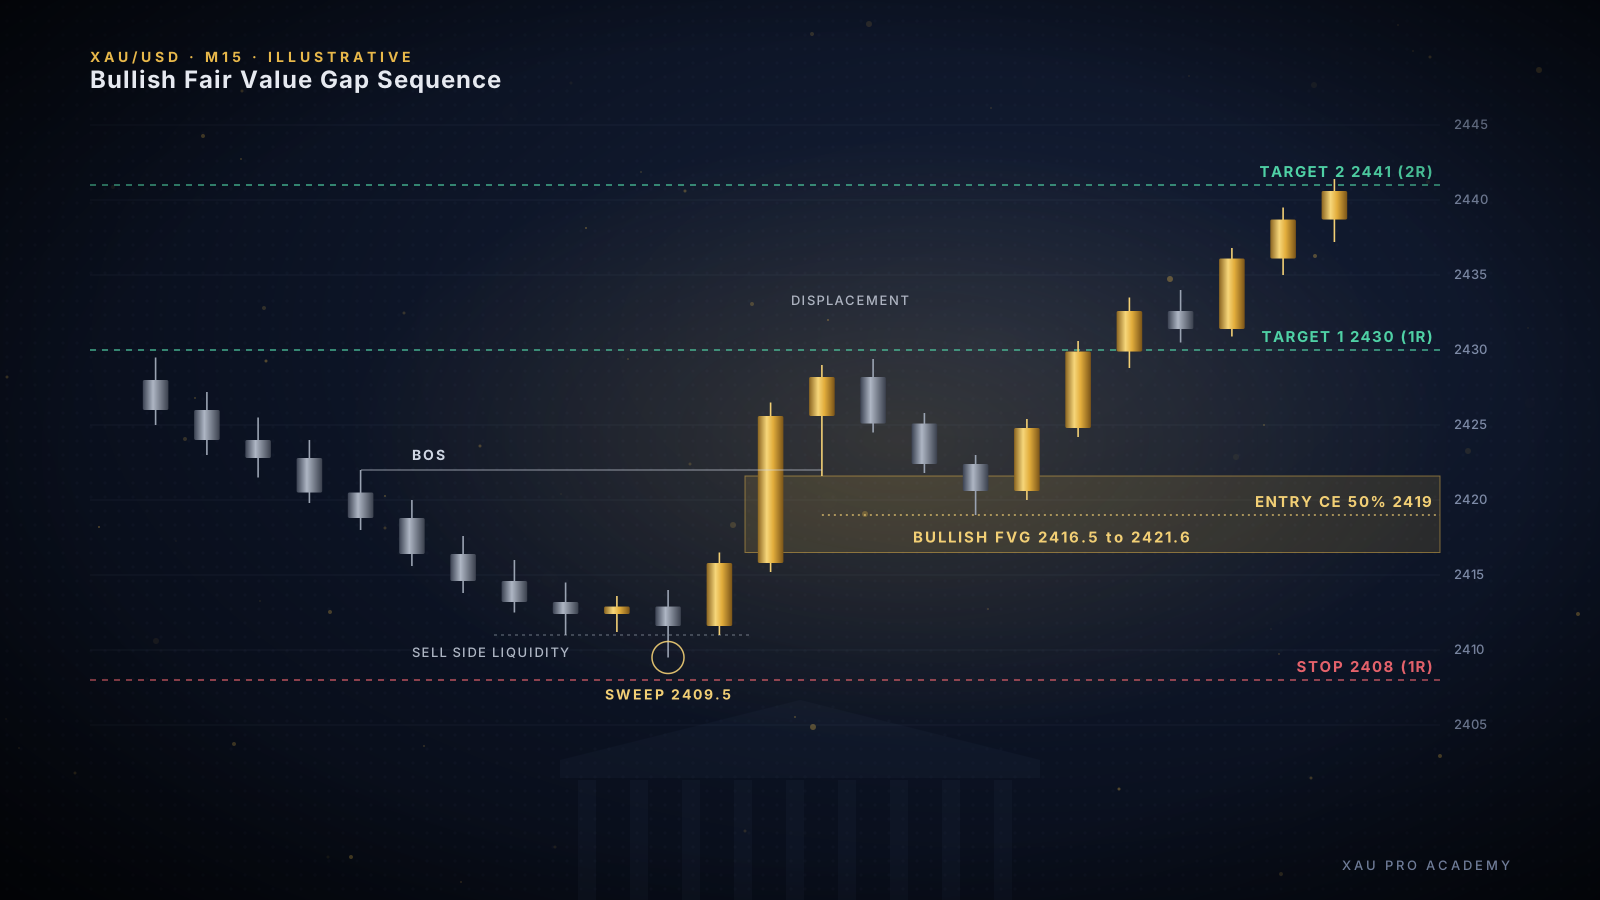
The diagram above shows the sequence with illustrative prices. Treat the numbers as a template for the calculation, not as a recorded trade.
- Context: H4 structure bullish, London session.
- Sweep: M15 equal lows near 2,409.5 taken, then rejected.
- Displacement: one large candle closes above the prior swing high at 2,419 (BOS).
- FVG: candle 1 high 2,416.5, candle 3 low 2,421.6. CE level at about 2,419.0.
- Entry: limit buy at 2,419.0.
- Stop: 2,408.0, below the swept low. Risk is 11 dollars per ounce, which is 1R.
- Target 1: buy side liquidity at 2,430.0, which equals 1R.
- Target 2: the next H1 liquidity pool near 2,441.0, which equals 2R.
The stop is wide by retail standards, and that is deliberate. Gold regularly trades through part of an FVG before reacting, so a stop at the gap edge is exposed to normal noise. Size the position to the stop distance, never the other way around.
Common Mistakes That Kill the Edge
Most traders see FVGs everywhere and trade none of them well. The repeating mistakes:
- Trading FVGs against H4 bias. A clean bullish FVG on M15 inside a bearish H4 leg is usually a pause before continuation, not a reversal.
- Skipping the liquidity sweep. Without a sweep, the gap has no evidence that resting orders were taken. It is a lower quality setup and should be treated as one.
- Stop loss too tight. Place the stop beyond the swept low or high, not just beyond the FVG edge.
- Entering mitigated gaps. A zone that has already been traded through has spent its imbalance.
- Ignoring the calendar. CPI, NFP and FOMC releases can blow through any gap. Stand aside around high impact events.
Wrap-Up
The FVG is not magic. It is a measurable inefficiency that price often returns to rebalance. On XAU/USD, with its deep participation and clean session liquidity, a qualified FVG gives a precise entry with a logical invalidation. Filter with H4 bias, demand a sweep and a body close BOS, execute at the 50 percent level, and skip anything that does not pass all four boxes. Missing a setup costs nothing. Forcing one does.
To see how a selective, rules based execution model performs over time, review the audited performance record and the individual trade replays in Case Studies.