Introduction: When Support Becomes Resistance
Every gold trader has seen it: price breaks a structure level, pulls back to the exact same zone, and then launches in the new direction. That zone is not a coincidence. It is a Breaker Block, one of the most precise entry tools in Smart Money Concepts, and one of the least understood.
On XAU/USD, where liquidity events are violent and reversals are fast, the Breaker Block often marks the exact price where institutions defend their new positions. Learning to read it turns a failed trade idea into a mapped opportunity.
What Is a Breaker Block?
A Breaker Block is a failed Order Block. An Order Block forms, price returns to it, but instead of holding, price breaks straight through it with displacement. That failure flips the role of the zone:
- A bullish breaker forms when a bearish Order Block fails. Price breaks above it, and the broken block becomes a demand zone on the retest.
- A bearish breaker forms when a bullish Order Block fails. Price breaks below it, and the broken block becomes a supply zone on the retest.
The logic is institutional. Traders who positioned at the original block are now trapped. When price returns to their entry, they exit at breakeven, and that order flow fuels the new move.
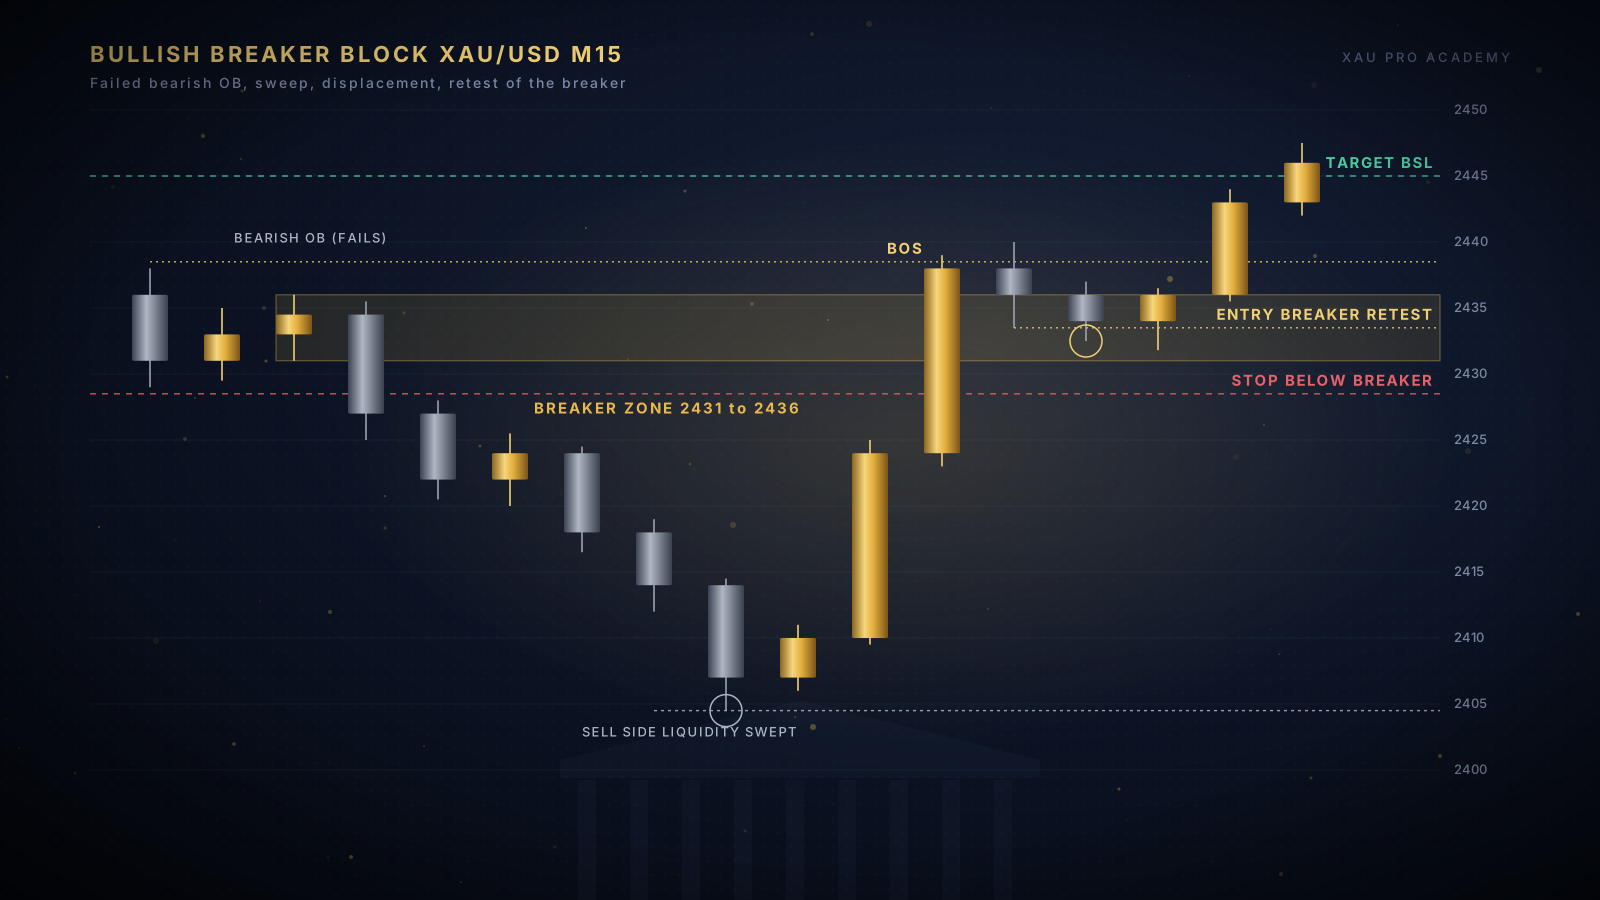
Anatomy of a Valid Breaker on Gold
Not every broken block qualifies. On XAU/USD we require four conditions:
- Liquidity sweep first. The move that breaks the block should originate from a sweep of a session high, session low, or equal highs and lows. Without a sweep, the break lacks fuel.
- Body close through the block. A wick through the zone is a liquidity interaction, not a break. We need a candle body closing beyond the block boundary.
- Displacement. The breaking candle must show intent: an expanded range, ideally leaving a Fair Value Gap behind it.
- Structure impact. The break should coincide with a Break of Structure or a Market Structure Shift on the execution timeframe.
A XAU/USD Example
Gold sweeps the Asian session low at the London open and reverses with displacement, breaking above the last bearish Order Block on M15. That broken block is now a bullish breaker. The plan:
- Entry: limit order at the breaker zone, ideally where it overlaps with the Fair Value Gap left by the displacement leg.
- Stop: below the sweep low, respecting gold volatility. Extremely tight stops do not survive on XAU/USD.
- Target: the next pool of buy-side liquidity, typically the previous session high or equal highs above.
Breaker Block vs Order Block
An Order Block is a first-touch zone: price has not yet violated it. A Breaker Block is a second-chance zone: the market already proved the original level wrong, and the flip in polarity is the edge. In practice:
- Order Blocks suit continuation entries within an established trend.
- Breaker Blocks suit reversal entries right after a structure shift, when the old trend's defenders are trapped.
A breaker that has already been mitigated by a deep retest loses value. Trade the first clean return, not the third.
Risk and Invalidation
The invalidation is objective: a body close back through the breaker cancels the setup. If price accepts beyond the zone, the trap has failed and the old structure is back in control. Exit and reassess rather than widening the stop.
As with every institutional setup, the breaker is one confluence, not a standalone signal. It earns a trade only when liquidity, displacement, and session context align with it.
Conclusion
The Breaker Block reframes failure into information. When a level breaks with displacement after a liquidity sweep, the market has shown you where the trapped orders sit. Mark the zone, wait for the retest, and let the institutional footprint define your entry, your stop, and your target.